GA-Z68X-UD3H-B3 RESOURCES
macOS installation and resources for the Gigabyte GA-Z68X-UD3H-B3 motherboard
macOS SIERRA 10.12 INSTALLATION on the GA-Z68X-UD3H-B3
-
Update the BIOS to the latest UEFI version
-
See the guide here if you are updating from a legacy version of the BIOS (version F12 or earlier)
-
See the modified BIOS here if you want to use an NVMe SSD
-
-
Follow the guide here to create a bootable USB drive to install macOS Sierra 10.12
-
In STEP 2: Create a Bootable USB Drive with UniBeast
-
Select UEFI Boot Mode for UniBeast as shown here →
-
-
In STEP 3: Recommended BIOS Settings, select the following:
-
Save & Exit > Load Optimized Defaults
-
M.I.T. > Advanced Frequency Settings > Advanced CPU Core Features > CPU EIST Function = Disabled
-
M.I.T. > Advanced Memory Settings > Extreme Memory Profile (X.M.P.) = Profile1*
*Set to Disabled if your RAM modules do not support Intel XMP -
BIOS Features > Intel Virtualization Technology = Disabled
-
BIOS Features > OS Type = Other OS
-
BIOS Features > Boot Mode Selection = UEFI Only
-
Peripherals > SATA Mode Selection = AHCI
-
-
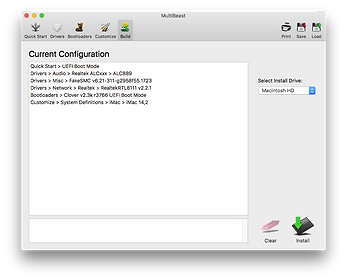
In STEP 5: Post Installation with MultiBeast, select the following:
-
Quick Start > UEFI Boot Mode
-
Drivers > Audio > Realtek ALCxxx > ALC889
-
Drivers > Network > Realtek > RealtekRTL8111 v2.2.1
The summary after clicking Build should look like this →
-
-
-
After the installation is complete, go to System Preferences > Energy Saver and set Computer sleep to Never (see note below on sleep issue)
-
Recommended additional steps to optimize CPU power management:
-
Confirm that you have an active connection to the Internet
-
Open Applications > Utilities > Terminal then copy and paste the following command in the Terminal window and hit Enter:
curl -o ~/ssdtPRGen.sh https://raw.githubusercontent.com/Piker-Alpha/ssdtPRGen.sh/master/ssdtPRGen.sh
(ignore any warnings about incompatibility with your CPU) -
Next, paste this command in the Terminal window and hit Enter:
chmod +x ~/ssdtPRGen.sh -
Finally, paste this command in the Terminal window and hit Enter:
./ssdtPRGen.sh -
Answer ‘N’ to the questions about copying and opening the ssdt files
A customized SSDT.aml for your specific machine will now be in the /Users/yourusername/Library/ssdtPRGen directory
(quickly access this directory in the Finder by holding the Option key (Windows key) while selecting the Go menu and then selecting Library) -
Copy SSDT.aml to /Volumes/EFI/EFI/CLOVER/ACPI/patched/
(you may need to run Clover Configurator to mount the EFI partition) -
Run Kext Utility to repair permissions and rebuild the boot cache, then restart the computer
-
-
Optional: Install HWSensors to monitor temperatures, voltages and CPU speed. DO NOT install LPCSensors.kext - this can prevent system fans from operating properly.
Notes
-
For more consistent USB 3.0 performance, install a macOS-compatible PCIe USB.3.0 card
-
If audio does not function correctly, run the audio_pikeralphaALC-120.command script available here
-
Sleep does not function correctly. Follow the progress on this issue here
-
Additional Clover bootloader resolutions can be enabled by following the steps in the video here
-
A simple method for custom key remapping is available here
Sources
RECOMMENDED macOS COMPONENTS
Graphics Card (AMD): SAPPHIRE AMD Radeon RX 580
-
No configuration necessary
-
Automatically recognized by macOS with full Metal compatibility for Sierra
-
Up to 12.5x better performance than integrated Intel HD Graphics 4000
-
Monitors should be connected to DisplayPort outputs on the card rather than DVI or HDMI, if possible.
Graphics Card (Nvidia): ZOTAC GeForce GT 730 Zone Edition
-
No configuration necessary
-
Automatically recognized by macOS with full Metal compatibility for Sierra
-
Up to 3x better performance than integrated Intel HD Graphics 4000
Wireless + Bluetooth Adapter: Fenvi T919 Broadcom BCM94360CD Adapter
-
No configuration necessary
-
Automatically recognized by macOS as built-in AirPort and Bluetooth
-
Supports 802.11a/b/g/n/ac, Airdrop, Handoff, and Bluetooth 4.0 in BIOS/UEFI and Bootloader
-
Install in PCIe x1 slot
USB 3.0 Adapter: Inateck KT4006 2-Port PCIe USB 3.0 Express Card
-
No configuration necessary
-
Automatically recognized by macOS as built-in USB 3.0 Hi-Speed Bus/SuperSpeed Bus
Keyboards: Apple Wireless Keyboard or Apple Wired Keyboard with Numeric Keypad
Any standard USB keyboard will work with this system, but Apple keyboards provide the functionality of various macOS-specific key mappings
MODIFICATIONS and TROUBLESHOOTING
Modified BIOS for NVMe Drive Booting
-
The modified U1n BIOS available here will enable booting from NVMe drives
-
Follow the included instructions to flash using the Q-Flash utility
-
Recommended NVMe drive: Western Digital Black SN750 NVMe SSD
-
Recommended NVMe PCIe adapter: NVMe PCIe 3.0 x4 Adapter Host Controller Expansion Card
BIOS Boot Loop
If the computer does not boot and continually restarts, the BIOS may have become corrupt. To restore the backup BIOS and resolve this issue:
-
Unplug the computer
-
Press and hold the computer's power button
-
While holding the power button, plug the computer in again
-
As the computer turns on (in one or two seconds) unplug the computer again
-
Wait a few seconds, plug in the computer and then start the computer
A dialog box will open up and show the progress of the backup BIOS overwriting the primary BIOS. This should resolve the boot loop and allow the computer to start normally.
Copy Main BIOS to Backup BIOS
Press <Alt>+<F10> at startup to copy the main BIOS to the backup BIOS. This will keep the same BIOS version on both BIOS chips rather than the version that shipped with the motherboard.
Ethernet Port Not Working
If the onboard Ethernet port is not being detected by the operating system the Realtek RTL8111E chip can be reset by following these steps:
-
Shut down and unplug the computer
-
Remove the CMOS battery shown here
-
Press and hold the power button for 30 seconds
-
Insert the CMOS battery and plug in the computer
-
Power on the computer and adjust the BIOS settings as necessary (they will be reset to default values)
SUPPORT and DOCUMENTATION